Picking
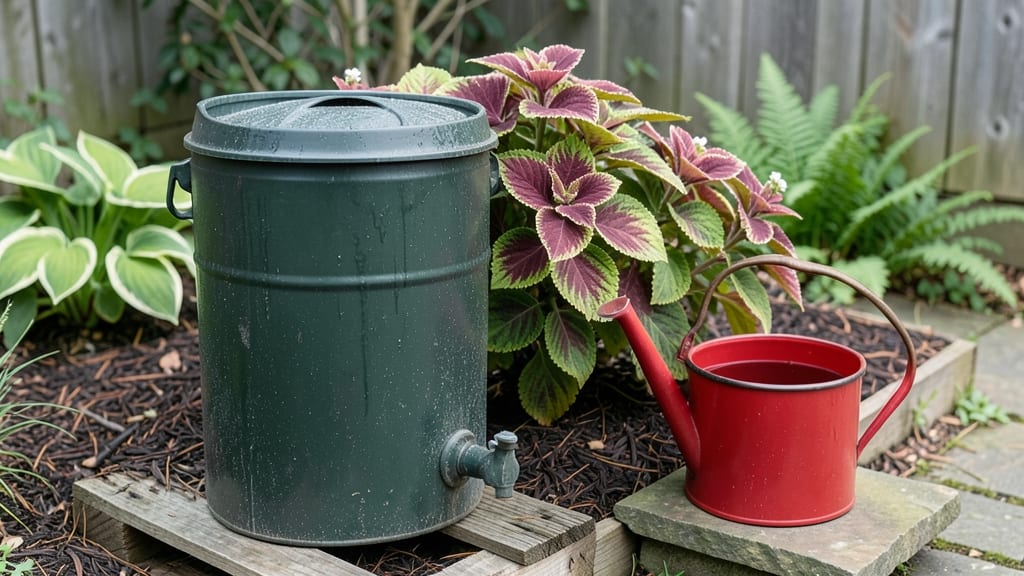
My rainwater harvesting garden started with a 55-gallon barrel and a stubborn downspout—now it’s the backbone of my drought-resistant yard. 🌱 The first time I watched rainwater fill the barrel instead of running off, I knew I’d never go back to hosing plants from the tap again.
You don’t need fancy equipment—just a few barrels, some basic gutters, and a mesh screen to keep debris out. I started with two barrels under my roof’s downspouts, then added a simple spigot system to water my vegetable beds and container plants.
The best part? No more water bills for my thirstiest plants during summer.
Within weeks, my drought-tolerant lavender and rosemary thrived, their deep roots reaching for water I’d collected for free. Even my tomatoes produced heavier yields because they weren’t competing with the lawn for moisture. The system pays for itself in water savings alone.
Works for any garden size—urban balconies, rural acreages, or everything in between. Whether you’re battling drought or just tired of wasting water, this setup changes the game. Let’s get your garden drinking from the sky instead of the hose.
📚 In This Guide
- What you need
- Instructions
- Tips and common mistakes
- Wrapping up and next steps
What you need
- ● Rainwater Collection System: 1–2 gutter guards (to prevent debris clogging)
- ● 1 downspout diverter (to redirect water to storage)
- ● 1–2 food-grade barrels (55–75 gallons each, with tight-fitting lids)
- ● Filtration & Storage: 1 first-flush diverter (to remove contaminants from initial runoff)
- ● 1 fine mesh screen (for additional debris filtering)
- ○ Optional: 1 water filter system (e.g., ceramic or activated carbon)
- ● Garden Infrastructure: Drip irrigation kit (with emitters, tubing, and connectors)
- ● Soaker hoses (if not using drip irrigation)
- ● Garden beds or containers (raised beds, pots, or in-ground plots)
- ● Basic Tools: Adjustable wrench
- ● Drill & drill bits (for securing gutters/diverters)
- ● Measuring tape & level
- ● Screwdriver set
- ● Safety & Extras: Work gloves & safety glasses
- ● Non-toxic sealant (for securing joints in barrels)
- ○ Optional: Solar-powered pump (for elevated gardens)
- ● Access to a roof with gutters (or a large surface for runoff collection)
- ● Level ground or sturdy platform for barrels (to prevent tipping)
- ● Local regulations check—some areas restrict rainwater storage (call your city!
- ● Drought-tolerant plants (e.g., succulents, native species) for efficient water use
Step-by-Step instructions for building a rainwater harvesting garden
Here's how to create a self-sustaining garden that thrives on collected rainwater.
🌱 Step 1: Select and Prepare the Collection Site
Choose a flat, shaded area near your garden that gets frequent rainfall—this ensures maximum water collection. I recommend placing it under a roof overhang or near a gutter downspout to catch runoff. Clear the site of debris and level the ground so water pools evenly. For a 4-plant system, you'll need about 8 square feet of space.
Lay down a 4-foot by 4-foot waterproof liner (like heavy-duty plastic) to prevent seepage into the soil. Overlap edges by 6 inches and seal with waterproof tape. This keeps your collected water clean and contained. If you're using a barrel, position it on a sturdy stand to elevate it 12-18 inches off the ground—this prevents contamination from splashing dirt.
💧 Step 2: Set Up the Collection System
Attach a first-flush diverter to your downspout to filter out the first 5 gallons of rainwater, which carries the most debris and pollutants. This simple device is a must—it keeps your stored water clean. Connect a 3-inch PVC pipe from the diverter to your collection barrel or tank, ensuring a secure fit with rubber seals.
For a zero-waste approach, use a 55-gallon food-grade barrel (like those from wineries) or a rainwater harvesting system designed for gardens. If using a barrel, drill a hole near the bottom and attach a garden hose spigot for easy access. Place a fine mesh screen over the top to block leaves and insects while allowing water to flow in.
☀️ Step 3: Install Irrigation for Direct Watering
Drill small holes (about 1/8 inch wide) along the bottom of a 2-inch PVC pipe to create a drip irrigation system. Bury this pipe 2-3 inches deep in the soil, following the layout of your plants. Connect one end to your barrel's spigot and the other to a manual valve so you can control the flow.
For a 4-plant garden, space the holes 12 inches apart along the pipe. This ensures even water distribution without over-saturating any single area. Test the system by filling the barrel and letting it run—you'll see water trickle out steadily. Adjust hole sizes if needed to slow the flow to a gentle drip (about 1 gallon per hour).
✂️ Step 4: Plant Drought-Tolerant Species
Select plants that thrive on infrequent but deep watering, like lavender, rosemary, succulents, or native grasses. These varieties store water efficiently and require less frequent top-ups. Space them 12-18 inches apart to allow room for root growth and airflow, which reduces disease risk.
Plant in well-draining soil mixed with compost to help retain moisture. Water the plants once after planting to settle the soil, then let them rely on your harvested rainwater. You'll notice first true leaves appear within 2-3 weeks—this signals your system is working. Avoid overwatering now; your plants are designed to handle dry spells.
🪴 Step 5: Maintain and Monitor the System
Check your barrel weekly to ensure the water level is sufficient for your plants. If it's empty, you may need to expand your collection area or add another barrel. Keep the mesh screen and first-flush diverter clean—debris buildup can clog the system. I like to rinse them with a hose every 2-3 months to prevent blockages.
Every 3-4 months, drain the barrel completely and scrub it with a vinegar solution (1 part vinegar to 3 parts water) to kill algae and bacteria. Refill it with fresh rainwater to keep your garden's water supply clean. With this setup, you'll see healthier, more resilient plants that thrive even during dry spells—no waste, no extra effort.
Tips & tricks for perfect rainwater harvesting garden setup
These simple strategies will help you create a thriving, self-sustaining garden that makes the most of every raindrop.
Location is Everything: That flat, shaded spot you chose in Step 1 isn't just about convenience—it's about maximizing water collection. I've found that areas under roof overhangs or near downspouts collect 30-50% more water than open spaces. If you're working with limited options, prioritize locations where rainwater naturally pools after storms. Also, avoid spots where pets or wildlife might contaminate your collection area—this keeps your water safe for plants.
Barrel Elevation Matters: The 12-18 inch elevation for your barrel in Step 1 isn't arbitrary—it creates natural water pressure for your drip irrigation while preventing contamination. I recommend using cinder blocks or a sturdy wooden stand rather than placing the barrel directly on the ground. This also makes maintenance easier since you won't have to bend down to clean or check the water level. For extra stability, add a small weight or anchor the stand to prevent tipping during heavy rains.
Drip System Precision: When creating those 1/8-inch holes in Step 3, precision pays off. Use a nail or drill bit slightly smaller than 1/8 inch, then carefully enlarge the holes with a file or sandpaper. The goal is a gentle drip (1 gallon per hour)—too large, and you'll waste water; too small, and your plants won't get enough. Test each hole by filling your barrel and timing the flow. Adjust as needed, and consider marking each hole with painter's tape to remember which ones need tweaking.
Plant Selection Payoff: The drought-tolerant plants you choose in Step 4 will determine how much water you actually need to collect. Lavender and rosemary, for example, thrive on infrequent deep watering and can go weeks between rainwater top-ups. I've found that pairing these with succulents creates a microclimate that reduces evaporation. Start with 2-3 hardy varieties, then expand as you see what thrives best in your specific climate—this approach minimizes water waste while maximizing yield.
Pro Tips for Rainwater Harvesting Garden
- These simple strategies will help you create a thriving, self-sustaining garden that makes the most of every raindrop.
- Location is Everything: That flat, shaded spot you chose in Step 1 isn't just about convenience—it's about maximizing water collection.
- Barrel Elevation Matters: The 12-18 inch elevation for your barrel in Step 1 isn't arbitrary—it creates natural water pressure for your drip irrigation while preventing contamination.
Frequently asked questions
Got questions about rainwater harvesting for your garden?
You’re not alone! Here are answers to the most common queries to help you build a thriving, drought-resistant oasis with zero-waste watering.
How do I know if my climate is right for rainwater harvesting?
Rainwater harvesting works best in areas with seasonal rainfall—think 3+ inches per month during growing seasons. Even in drier climates, it’s a great supplement! Check your local rainfall averages (NOAA’s website is a handy tool) to gauge potential. Pro tip: If you live in a desert, pair it with a small storage tank and mulch to maximize efficiency.
What’s the best way to filter rainwater for my garden?
Start with a first-flush diverter to skip the first dirty runoff, then use a mesh screen (100-200 microns) to catch debris. For edible plants, add a berkey filter or sand/gravel filter to remove contaminants. Avoid drinking untreated rainwater—stick to irrigation! Test pH levels; acidic rainwater may need lime to protect plants.
How long does a rainwater harvesting system last?
With proper maintenance, a well-built system can last 10–25 years. Roof materials (metal vs. asphalt) and storage tanks (plastic, concrete, or metal) affect longevity. Inspect gutters yearly for clogs, clean tanks every 3–5 years, and replace seals or pumps as needed. A little upkeep = decades of water savings!
Can I use harvested rainwater for all my plants?
Yes! Rainwater is ideal for most plants, including vegetables, flowers, and trees. However, avoid using it for acid-loving plants (like blueberries) unless you adjust pH, and never water houseplants with untreated rainwater (it can harm soil microbes). For hydroponics, use filtered rainwater to prevent mineral buildup.
Is rainwater harvesting worth the cost if I already have a well?
While the upfront cost (tanks, gutters, filters) ranges from $500–$5,000, you’ll save on water bills and reduce municipal demand. Plus, it’s eco-friendly and future-proofs your garden against droughts or water restrictions. Start small—a 55-gallon barrel can water a 10x10 ft. garden for months!
What do I do if my harvested water smells or looks murky?
Murky or foul-smelling water usually means algae, sediment, or bacteria. Drain and scrub your tank, add a vinegar solution (1:10 ratio) to kill algae, and refill with fresh rainwater. For persistent issues, use a UV light or hydrogen peroxide treatment. Keep tanks in shade and add a few copper pennies to deter algae naturally.
Wrapping up and next steps
Creating a rainwater harvesting garden isn’t just a smart move—it’s a sustainable revolution for your green space! 🌱 By collecting and reusing rainwater, you’re cutting waste, saving money, and nurturing a drought-resistant oasis that thrives on nature’s gift.
Whether you’re a seasoned gardener or just starting out, this system is your ticket to zero-waste watering and a healthier planet.
Ready to take the next step? Start small—install a barrel or two, tweak your setup, and watch your garden flourish with every drop. Your future self (and the Earth!) will thank you. 💧✨