Landscaping
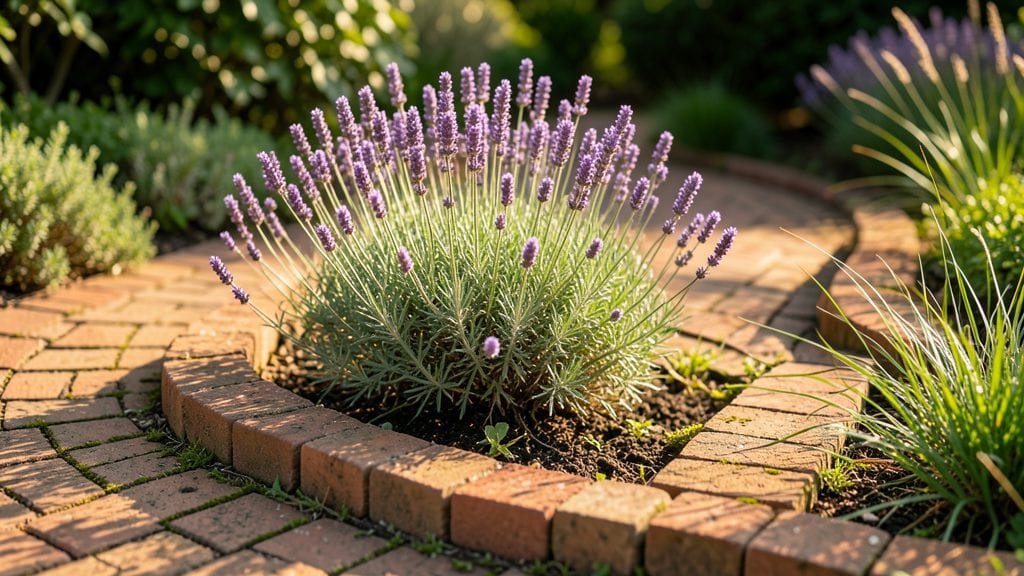
My brick garden design started with a single rustic pathway that transformed a muddy backyard into a welcoming space. 🌿 The right bricks—whether classic red clay or reclaimed cobblestones—add timeless charm while solving drainage problems and defining garden zones.
I’ll show you how to mix patterns like herringbone or basketweave to create visual interest without overwhelming your yard.
You don’t need a landscape architect to pull this off—just a tape measure, a level, and a few basic tools. Start with a simple border for flower beds or a winding path to guide visitors through your space.
For durability, opt for bricks rated for outdoor use, and pair them with gravel or sand for stability. The best part? These designs age beautifully, blending seamlessly with both modern and cottage-style gardens.
Imagine stepping onto a warm brick path lined with lavender and rosemary, or framing a raised bed with rustic bricks that hold mulch perfectly. The possibilities go beyond aesthetics—brick borders also keep weeds at bay and protect plant roots from erosion.
By the end, you’ll have a functional, stylish garden that feels like it’s been there for decades.
Whether you’re working with a small urban patio or a sprawling backyard, brick elements adapt effortlessly. Urban spaces benefit from sleek, low-maintenance designs, while cottage gardens thrive with textured, layered patterns. Let’s turn your vision into a lasting centerpiece—one brick at a time.
📚 In This Guide
- What you need
- Instructions
- Tips and common mistakes
- Wrapping up and next steps
What you need
- ● Brick: 100–200 bricks per sq. ft. (depending on layout; standard size: 3.5" x 7.5"). Choose clay bricks for durability or concrete bricks for modern looks.
- ● Sand: 1–2 bags (50 lb each) for bedding bricks; poly-sand or masonry sand recommended.
- ● Gravel: 1–2 bags (50 lb each) for drainage layer; crushed stone (3/8" size) works best.
- ● Landscape Fabric: 1 roll (4’ x 50’) to prevent weed growth.
- ● Cement/Sand Mix: 1–2 bags (40 lb) for mortar (if not using dry-set bricks).
- ● Edging Material: Metal, plastic, or brick edging (10–20 ft, depending on project).
- ● Shovel & Spade – For digging and leveling.
- ● Wheelbarrow – To haul gravel, sand, and bricks.
- ● Rubber Mallet – For tapping bricks into place.
- ● Level – Ensures your design stays perfectly even.
- ● String Line & Stakes – Marks layout before digging.
- ● Safety Gear: Gloves, knee pads, and goggles (because brick work is serious business!).
- ● Brick Sealer: Protects against stains and weather.
- ● Decorative Stones: Add contrast with pebbles or flagstone accents.
- ● Plants: Succulents, herbs, or shrubs for planter borders.
- ● Solar Lights: Embed along pathways for magical evening vibes.
Step-by-Step instructions for creating a brick garden design
Here's how to build timeless brick pathways and planters that add charm to any outdoor space.
🪴 Step 1: Plan and Mark Your Design Layout
Sketch your design on paper first—brick projects are all about precision. Measure your space carefully and mark the layout with spray paint or a garden hose. For pathways, I like to keep them 2-3 feet wide for easy walking, while planter borders work best at 12-18 inches wide around garden beds. Use stakes and string to create straight lines if needed.
Check your measurements twice before digging. A common mistake is cutting corners on layout, which leads to uneven bricks later. Walk through your design to visualize the flow—you'll want clear paths between planters and seating areas if you have them.
💧 Step 2: Excavate and Prepare the Base
Dig down 4-6 inches deep along your marked lines, removing any grass or weeds. The base needs to be level—use a shovel to smooth the bottom and a 4-foot level to check for evenness. For pathways, I recommend adding 2-3 inches of compacted gravel as a base layer to prevent shifting.
For planter borders, create a slight lip on the inside edge (about 1 inch high) to hold soil. Tamp everything down firmly with a hand tamper or plate compactor. This step is critical—skipping proper base prep leads to bricks sinking or cracking over time.
☀️ Step 3: Lay the Brick Foundation
Start with a sand bed—spread 1 inch of coarse sand evenly over your prepared base. Use a straightedge to level it perfectly. Begin laying bricks in your chosen pattern (running bond is easiest for beginners), spacing them 1/4 inch apart. Tap each brick gently with a rubber mallet to set it flush.
Check your first row with the level frequently—even a slight dip will compound as you work. For curves, cut bricks with a masonry saw. I always save cut pieces for less visible areas. Leave space for any drainage or irrigation lines if needed before the next layer.
✂️ Step 4: Secure and Finish the Layout
Once your first layer is complete, sweep dry sand into the joints to lock the bricks in place. For pathways, add a second layer of bricks if desired, repeating the sand bed process. For planters, build the border up 2-3 bricks high to contain soil properly. Use a plate compactor to settle everything firmly.
Finish by sweeping joint sand into the gaps and brushing off excess. For pathways, I like to add a final layer of polymeric sand for durability. Let everything settle for 24 hours before adding plants or walking on it—this prevents shifting.
🌿 Step 5: Add Plants and Final Touches
Fill planter borders with your chosen soil mix and plant your selections. For pathways, consider adding ground cover between bricks (like creeping thyme) for a polished look. Water everything thoroughly after planting to help settle the soil and encourage root growth.
Step back and admire your work! The key to a great brick garden is in the details—clean lines, proper spacing, and thoughtful plant choices make all the difference. With this foundation, your design will last for years with minimal maintenance.
Tips & tricks for perfect brick garden design
Here's what nobody tells you about brick garden projects that'll save you hours of frustration and make your design look like a pro did it.
Precision is Everything: In Step 1, when marking your layout, I can't stress this enough—use a 4-foot level to check every few feet, not just at the start. Bricks follow the base perfectly, so even a slight dip in your initial layout will show up dramatically once you start laying them. I've seen beautiful designs ruined by a 1/4-inch dip that wasn't caught early. Trust me on this: measure diagonally too, not just side-to-side.
The Base is Where It's Made or Broken: For Step 2, don't skimp on the gravel base for pathways. I learned this the hard way after my first pathway shifted within a year. Compact that gravel in 1-inch layers with a hand tamper—don't rush it. For planter borders, that 1-inch lip on the inside edge is your secret weapon for keeping soil contained. I've seen planters collapse when this step was skipped, especially with heavy soil.
Sand Secrets: That 1-inch sand bed in Step 3 isn't just filler—it's your leveling tool. Use a straightedge to scrape off excess sand after each row, then tap the bricks gently with a rubber mallet. Pro tip: Sift your sand through a 1/4-inch mesh screen first to remove any debris that could create uneven spots. And for the final joints, polymeric sand is worth the extra cost—it locks bricks in place permanently and won't wash out like regular sand.
24-Hour Rule: The 24-hour settling period in Step 4 is non-negotiable. I know you're excited to use your new pathway, but walking on it too soon compacts the sand and can cause bricks to shift. Use this time to gather plants or materials for the final touches. Think of it as your brick garden's curing period—just like concrete, it needs time to fully set before heavy use.
Pro Tips for Brick Garden Design
- Here's what nobody tells you about brick garden projects that'll save you hours of frustration and make your design look like a pro did it.
- Precision is Everything: In Step 1, when marking your layout, I can't stress this enough—use a 4-foot level to check every few feet, not just at the start.
- The Base is Where It's Made or Broken: For Step 2, don't skimp on the gravel base for pathways.
Frequently asked questions
about brick garden design—because every great yard starts with the right answers! Here’s what you need to know before diving in.Can I install a brick garden pathway myself, or should I hire a pro?
Many homeowners DIY brick pathways with basic tools and patience! If your project is small (under 50 feet) and features simple patterns, you can tackle it solo. For complex curves, heavy materials, or uneven terrain, hiring a pro ensures precision and longevity. Pro tip: Rent a plate compactor to save on labor costs!
What’s the best time of year to build a brick garden border?
Spring or fall are ideal for brick garden projects. Spring offers warm soil for easy digging, while fall avoids summer heat and winter freezes. Avoid winter installations—frost can shift bricks and disrupt mortar. Rainy days? Wait for dry weather to prevent muddy conditions that weaken foundations.
Are there cost-effective alternatives to traditional brick?
Yes! Consider reclaimed bricks (eco-friendly and budget-friendly), concrete pavers (durable and cheaper), or natural stone (rustic charm). For planter borders, cinder blocks or stacked logs work well too. Always check local suppliers for bulk discounts!
How do I fix uneven bricks or gaps in my brick garden design?
Uneven bricks? Check your base—compacted gravel or sand should be level before laying bricks. For gaps, use polymeric sand (sweep it into joints) or mortar (for permanent fixes). If bricks sink over time, re-level them with a rubber mallet and add sand underneath. Pro tip: Seal joints annually to prevent weed growth!
Can I plant directly against brick borders without damaging them?
Use mulch (wood chips or straw) to protect bricks from root pressure and retain moisture. Avoid aggressive plants like ivy or bamboo near brick edges—they can crack over time. Opt for perennials (like lavender or sedum) or ground covers (creeping thyme) for a low-maintenance, brick-friendly garden.
Wrapping up and next steps
Transforming your outdoor space with brick garden design is all about blending timeless charm with functional beauty—whether through rustic pathways or sleek planter borders. The key lies in choosing the right materials, planning your layout, and adding personal touches like lighting or plants to make it uniquely yours. 🌿
Ready to take the next step? Start small with a single brick border or pathway, then expand as inspiration strikes. Your dream garden is just a few bricks away! 💡