
Shrubs
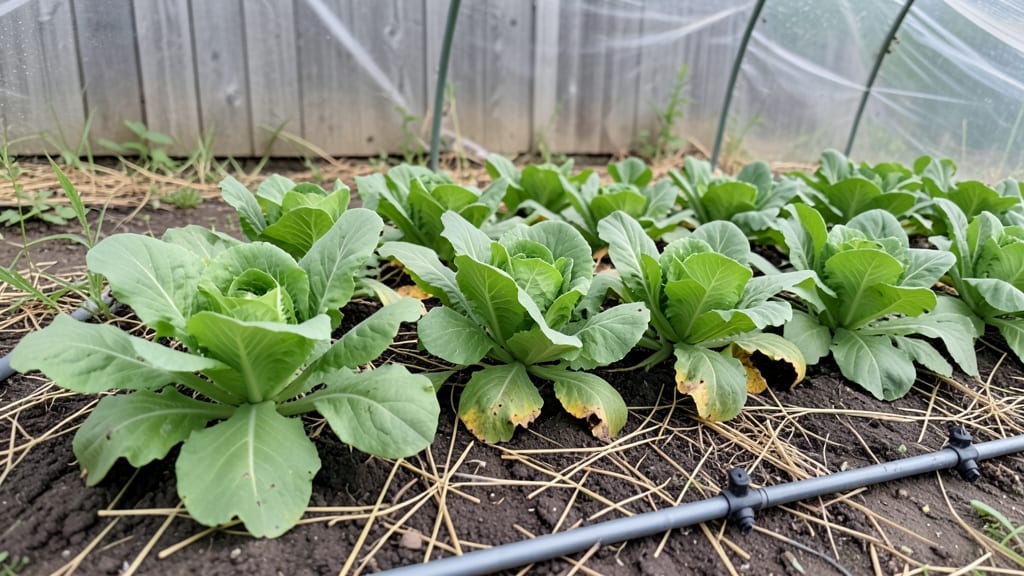
My first low tunnel gardening setup turned a 4x8-foot patch into a winter salad bar. 🌱 The clear plastic arches trap heat like a greenhouse but stay simple enough for beginners to assemble in under an hour.
I planted spinach, kale, and carrots in October, and by December, we were harvesting fresh greens while neighbors braved grocery store prices.
You don’t need fancy materials—just sturdy hoops (PVC pipes or metal arches), clear plastic sheeting, and some stakes to secure it. The key is keeping it snug in cold months to protect plants from frost while leaving vents open in summer to prevent overheating.
My biggest mistake? Forgetting to remove the plastic during rainstorms—it turned my garden into a swamp overnight.
What you’ll get is an extension of your growing season that feels like magic. Spinach stays crisp through January, radishes pop up in February, and even delicate lettuce survives light frosts.
The tunnels also deter pests like rabbits and deer, which makes them a game-changer for small urban gardens where space is limited but ambition isn’t.
Works for everything from leafy greens to early tomatoes, and adapts to both raised beds and in-ground planting. The only real rule? Monitor weather closely—what saves your plants in winter can smother them in summer if you’re not careful. Let’s get those tunnels built!
📚 In This Guide
- What you need
- Instructions
- Tips and common mistakes
- Wrapping up and next steps
What you need
- ● Low Tunnel Hoops: PVC pipes (½" to ¾" diameter) or metal hoops (galvanized steel or aluminum) – 1 hoop per 2–3 feet of row (e.g., 10 hoops for a 20-foot row).
- ● Height: 2–4 feet (adjust based on plant type and coverage needs).
- ● Covering Material: Clear UV-stabilized plastic sheeting (4–6 mil thickness) or agricultural fabric (e.g., frost cloth for cooler seasons).
- ● Width: At least 4–6 feet wide to drape over hoops with overlap.
- ● Length: Match your row length (add 2–3 feet extra for securing edges).
- ● Anchoring Supplies: T-posts, stakes, or rocks (to secure hoops in place).
- ● Bungee cords, zip ties, or hoop clamps (to attach covering to hoops).
- ○ Optional Add-Ons for Extra Protection: Ventilation: Zippered tubes or mesh panels (for hot climates).
- ● Side Panels: Removable fabric or plastic to block wind.
- ● Drip Irrigation Kit: To keep plants hydrated under cover.
- ● 🌱 Garden Bed: Prepped soil (6–12 inches deep) with good drainage.
- ● 📏 Level Ground: Slightly elevated beds work best for airflow.
- ● 🔧 Basic Tools: Scissors, utility knife, or staple gun (for securing fabric).
- ● ⏳ Time: 1–2 hours for setup (depending on tunnel size).
Step-by-step instructions for building your first low tunnel
Here's the straightforward method I use to create a sturdy, weatherproof low tunnel for my small garden plots.
🪴 Step 1: Choose and Prepare Your Base Structure
Start with a 4-foot wide, 8-foot long rectangular frame made from 1-inch diameter PVC pipes cut into 4-foot lengths for the sides and 8-foot lengths for the top arches. Bend the top pipes into gentle arches using a pipe bender or by carefully heating sections over a flame (wear gloves—this gets hot!).
Assemble the frame by connecting the side pipes to the arch pipes at both ends using PVC pipe connectors. Space the arches 2 feet apart along the length of your plot. This creates a sturdy, flexible structure that can handle snow and wind. I always test the frame by gently pushing down on the arches—if they spring back, it's ready for covering.
🌱 Step 2: Secure the Covering Material
Lay out your 6-foot wide, 10-foot long clear corrugated plastic sheeting over the frame, allowing 1 foot of overhang on all sides. This extra material helps keep wind and rain out. Secure the edges by burying them 2-3 inches deep along the sides of your plot, or weigh them down with bricks or cinder blocks spaced every 3 feet.
For the ends, use zip ties to attach the plastic to the side pipes. Pull the plastic taut but not overly tight—you want just enough tension to keep it flat when it rains. I always check the seams first thing in the morning to ensure no gaps have formed overnight from shifting soil or wind.
☀️ Step 3: Add Ventilation and Support
Install two 12-inch diameter vent tubes along each long side of the tunnel, spaced 4 feet apart. These are essential for preventing overheating on sunny days. Slide the tubes through the plastic before securing it, positioning them at mid-height on the sides. You can also add removable vent flaps made from burlap or shade cloth if your climate gets very hot.
For extra stability, especially in windy areas, add cross-braces made from ½-inch diameter PVC pipe every 4 feet along the length of the tunnel. Connect them from arch to arch using zip ties. This reinforcement keeps the structure from collapsing under heavy snow or strong gusts. I always do this in late fall before the first frost hits.
⏰ Step 4: Plant and Maintain Your Low Tunnel Garden
Once your tunnel is built, plant fast-growing crops like lettuce, spinach, or radishes at the north end (where they'll get morning sun) and heat-loving plants like tomatoes or peppers at the south end. Use drip irrigation inside the tunnel to keep soil moist without disturbing the plastic covering. Water in the early morning to reduce evaporation and fungal risks.
Monitor temperature inside the tunnel daily. On mild days, open the vent tubes fully by 10 AM to prevent overheating. If frost threatens, close the vents completely and add extra row covers for sensitive plants. I keep a small thermometer inside to track conditions—aim for 50-75°F for most vegetables. This balance keeps your plants thriving year-round.
Tips & tricks for perfect low tunnel gardening
Between us, building a low tunnel is one of those projects where small details make all the difference between a flimsy structure that collapses in the first storm and a sturdy shelter that extends your growing season. Here's what I've learned after testing tunnels in wind, snow, and heat.
Frame Flexibility is Key: When bending those 8-foot arch pipes, aim for gentle curves—not sharp bends. I use a pipe bender for clean arches, but if you're heating sections over a flame, work in 6-inch increments and let each section cool completely before moving to the next. The arches should flex slightly when you push down—they need that flexibility to handle snow loads without breaking. Trust me on this: a rigid frame will snap in a heavy snowfall.
Plastic Tension Secrets: That 1-foot overhang on your 6-foot wide plastic isn't just for looks—it's your first line of defense against wind. When securing the edges, bury them at a slight angle (not straight down) so rain runs off cleanly. For the ends, I use heavy-duty zip ties every 12 inches along the edges rather than just at the corners. This prevents the plastic from billowing in windy conditions, which can tear the seams over time.
Ventilation Strategy: The two 12-inch vent tubes you install should be positioned at mid-height, but here's the trick: add removable flaps made from burlap or shade cloth that you can adjust based on temperature. On days when your thermometer hits 75°F inside by 10 AM, open those vents fully. I've seen tunnels overheat to 100°F+ in just a few hours, which can scorch your plants. Pro tip: Place your thermometer near the hottest spot (usually the south side) for accurate readings.
Seasonal Reinforcement: That cross-bracing with ½-inch PVC every 4 feet isn't just for wind—it's your winter insurance. I add these braces in late fall before the first frost, but here's what nobody tells you: reinforce the center arches first. They bear the most weight from snow accumulation. Use zip ties to connect the braces, but leave a little slack—the structure needs to flex, not become rigid. Think of it like a suspension bridge: some give prevents total collapse.
Pro Tips for Low Tunnel Gardening
- Between us, building a low tunnel is one of those projects where small details make all the difference between a flimsy structure that collapses in the first storm and a sturdy shelter that extends your growing season.
- Frame Flexibility is Key: When bending those 8-foot arch pipes, aim for gentle curves—not sharp bends.
- Plastic Tension Secrets: That 1-foot overhang on your 6-foot wide plastic isn't just for looks—it's your first line of defense against wind.
Frequently asked questions
Got questions about low tunnel gardening?
Here are answers to the most common ones—whether you're a beginner or a seasoned grower looking to optimize your setup.
What’s the best time of year to set up a low tunnel?
Low tunnels extend your growing season, so set them up before the first frost (fall) or early spring to give plants a head start. For winter crops like spinach or kale, install them in late summer or early fall. Remove them in late spring once temperatures stabilize.
Can I use a low tunnel in winter?
Low tunnels trap heat and protect plants from frost, snow, and wind. Use them for cold-hardy crops like lettuce, broccoli, or peas. Just ensure good airflow to prevent rot, and remove snow buildup. For extreme winters, add row covers or mulch for extra insulation.
Are low tunnels worth the investment for small gardens?
Yes! They’re cost-effective, using simple materials like PVC pipes, hoops, and plastic sheeting. They save space, boost yields, and protect plants from pests. For a small garden, a DIY tunnel (under $50) can double your harvest—making it a high-ROI project!
How do I keep pests out of my low tunnel?
Combine physical barriers (fine mesh screens) with natural deterrents like companion planting (e.g., marigolds for aphids). Inspect plants regularly, and remove affected leaves promptly. Avoid overwatering, which attracts slugs and fungus gnats. A mix of prevention and monitoring keeps pests in check.
What’s an alternative if I don’t want to use plastic sheeting?
Try removable fabric row covers (like Agribon) for breathability and pest control, or hoop houses with shade cloth for summer heat protection. For a permanent (but pricier) option, consider polycarbonate panels, which last longer and allow light diffusion.
Wrapping up and next steps
Low tunnel gardening is a game-changer for extending your growing season, protecting delicate plants, and maximizing small spaces—no matter your green thumb level! 🌱 With just a few affordable materials and a little creativity, you can shield your crops from frost, pests, and harsh winds while boosting yields.
Whether you're a beginner or a seasoned gardener, this method proves that big results come from small, smart investments.
Ready to transform your garden? Start small—try a low tunnel with your favorite cold-hardy veggies or herbs this fall—and watch your confidence (and harvests!) grow. Happy planting! 🌿