
Diseases
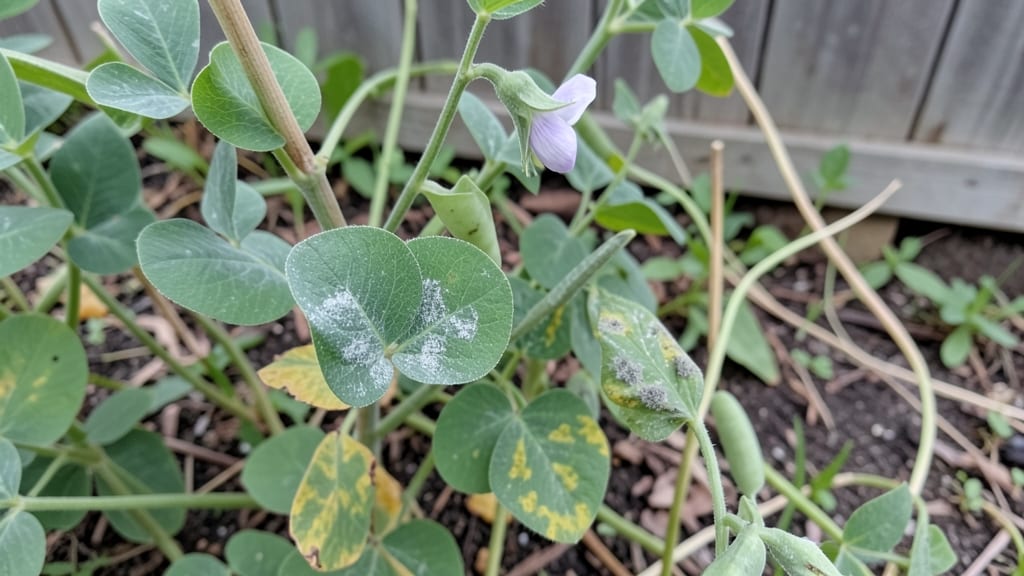
Garden pea diseases like powdery mildew and downy mildew can turn your lush vines into a sad, spotted mess—unless you catch them early.
I’ve seen entire patches of sweet peas collapse from fungal blights, and the key to saving your harvest is knowing what to look for before it’s too late. The good news? Most of these issues are preventable with simple adjustments to spacing, watering, and variety choices.
Powdery mildew starts as white, dusty patches on leaves, while downy mildew shows up as yellow spots with fuzzy gray undersides. Fusarium wilt is trickier—it causes sudden wilting and brown stems, often when roots rot from overwatering. The worst part?
These diseases thrive in crowded, damp conditions, so proper airflow and moisture control make all the difference. Resistant varieties like ‘Oregon Sugar Pod’ or ‘Green Arrow’ can also spare you the heartbreak of losing your crop.
Once you spot trouble, act fast: prune infected leaves, improve airflow with wider spacing, and avoid overhead watering. A homemade spray of baking soda, neem oil, or copper fungicide can stop mildew in its tracks if caught early.
The goal isn’t just to treat—it’s to break the cycle so next year’s peas stay healthy and productive. With these steps, you’ll go from panicked gardener to confident pea grower in no time.
Here’s the thing—prevention is easier than cleanup. Rotate crops yearly, choose disease-resistant seeds, and keep your garden tidy by removing debris where fungi love to hide.
Trust me, your future self will thank you when your peas climb tall and strong, free of those telltale spots. Let’s get those vines thriving!
Root Causes Of Pea Problems
Garden pea diseases rarely strike without reason—understanding the why behind them is half the battle in prevention. These issues thrive when specific conditions align, often tied to environmental stress, pathogen presence, or cultural mismanagement. Below, we break down the key triggers behind pea diseases, from fungal invaders to physiological weaknesses.
Peas need space to breathe—literally. When plants grow too close together, humidity lingers between leaves, creating a damp, cozy environment that fungal pathogens (like Mycosphaerella pinodes) adore. Poor airflow also delays drying after rain or irrigation, prolonging moisture on foliage—ideal for spore germination.
- Why it matters: Crowded plants stress each other, weakening defenses and making them more susceptible to infections.
- Actionable fix: Space pea plants 2–3 inches apart in rows 12–18 inches apart for optimal airflow.
- Pro tip: 💡 Thin seedlings early to avoid overcrowding—don’t wait for symptoms to appear!
Peas hate soggy roots. While they need consistent moisture, waterlogged soil suffocates roots, disrupts nutrient uptake, and invites root rot (often caused by Fusarium or Pythium). Overhead watering also splashes spores from soil onto leaves, spreading diseases like powdery mildew.
- Why it matters: Water-stressed peas produce less chlorophyll, making them 30% more vulnerable to fungal attacks.
- Actionable fix:
- Water at the base (drip irrigation or soaker hoses) to avoid wetting leaves.
- Ensure soil drains within 6–12 hours after watering.
- Avoid late-day watering—wet foliage overnight = disease buffet.
- Pro tip: 🌡️ Use a moisture meter to check soil—peas prefer 60–70% humidity in the root zone.
Many pea diseases are soil-borne, meaning they lurk in the dirt as dormant spores until conditions are perfect. Pathogens like Ascochyta blight can survive in soil for years, while others (e.g., downy mildew) hitchhike on contaminated seeds or old plant debris.
- Why it matters: If you planted peas in the same spot last year, spores may have multiplied over winter, waiting for fresh hosts.
- Actionable fix:
- Rotate crops—avoid planting peas in the same bed for 3+ years.
- Solarize soil in summer (60°C/140°F for 4–6 weeks) to kill spores.
- Buy certified disease-free seeds from reputable suppliers.
- Pro tip: ✨ Treat seeds with a 10-minute soak in a 1% hydrogen peroxide solution to reduce spore loads.
Peas are cool-season crops, but extreme heat or sudden temperature swings throw them off balance. High humidity (>80%) combined with warm nights (70–80°F) accelerates fungal growth, while cold, wet springs encourage bacterial blights. Even powdery mildew thrives when days are hot but nights stay damp.
- Why it matters: Peas stop photosynthesizing efficiently above 85°F, weakening their immune response.
- Actionable fix:
- Plant in early spring or fall to avoid peak summer heat.
- Use shade cloth (30–50%) if growing in hot climates.
- Improve airflow with trellises to reduce humidity near plants.
- Pro tip: 🎯 Monitor your microclimate—hygrothermometers help track humidity spikes.
Peas are legumes, meaning they fix nitrogen from the air—but they still need balanced nutrition. Deficiencies in phosphorus, potassium, or micronutrients (like boron or zinc) weaken cell walls, making plants easier targets for pathogens. Over-fertilizing with nitrogen can also promote lush, disease-prone growth.
- Why it matters: A boron deficiency (common in sandy soils) causes black spot and cracked pods—entry points for fungi.
- Actionable fix:
- Test soil before planting—aim for pH 6.0–7.0 for peas.
- Add compost or bone meal (for phosphorus) at planting.
- Avoid high-nitrogen fertilizers—stick to balanced (5-10-10) or low-N blends.
- Pro tip: 💪 A seaweed extract spray boosts natural defenses and provides trace minerals.
Fixing Fungal Foes in Peas
Now that you’ve identified the culprit behind your peas’ woes, it’s time to take action! Fungal diseases like powdery mildew, downy mildew, and root rot don’t stand a chance with the right mix of prevention, treatment, and garden hygiene.
Below, we’ll break down practical, step-by-step solutions tailored to each common pea disease—plus pro tips to keep your plants thriving long-term.
Cause: Erysiphe pisi thrives in humid, shaded conditions, leaving white, powdery patches on leaves. Fix It Fast:
- 🔥 Remove Infected Leaves: Snip off heavily mildewed foliage (don’t compost it—toss in the trash!).
- 🍳 Spray with Baking Soda Mix: Combine 1 tsp baking soda + 1 quart water + a few drops of dish soap (so it sticks). Spray every 7–10 days at dawn or dusk to avoid burning leaves.
- 🌿 Improve Airflow: Space plants 4–6 inches apart and prune nearby foliage to let sunlight and air circulate.
- 💡 Prevention Pro Tip: Plant resistant varieties like ‘Tom Thumb’ or ‘Oregon Sugar Pod’ and rotate crops—never plant peas in the same spot two years in a row.
Cause: Peronospora pisi loves damp leaves, creating yellow spots on top and fuzzy gray growth underneath. Fix It Fast:
- 👨🍳 Copper Fungicide Spray: Use copper-based fungicide (like Bonide Copper Fungicide) every 5–7 days until symptoms vanish.
- ⏰ Water Wisely: Water early in the morning so leaves dry by evening. Avoid overhead watering—use drip irrigation instead.
- 🌡️ Boost Heat Tolerance: If possible, grow peas in warmer microclimates (downy mildew thrives in cool, wet weather).
- 🎯 Prevention Pro Tip: Solarize soil in fall by covering it with clear plastic for 4–6 weeks to kill fungal spores before planting.
Cause: Fusarium or Phytophthora fungi rot roots in soggy soil, stunting growth and causing wilting. Fix It Fast:
- 🔪 Prune Damaged Roots: Gently dig up the plant, trim black, mushy roots, and replant in fresh, well-draining soil.
- 🥘 Amend Soil: Mix in compost, perlite, or coarse sand to improve drainage. Avoid heavy clay soils.
- 💡 Prevention Pro Tip: Plant peas in raised beds or mounds to prevent waterlogging. Crop rotation is a must—wait 3 years before replanting peas in the same spot.
No matter the disease, these universal tactics will fortify your peas:
- 🌿 Rotate Crops: Never plant peas (or other legumes) in the same spot yearly.
- 🍂 Clean Up Debris: Remove all plant residue after harvest to starve fungi.
- 💪 Strengthen Plants: Feed with compost tea or fish emulsion to boost natural resistance.
✨ Final Thought: Fungal diseases are manageable—act fast, stay consistent, and prioritize prevention. With these strategies, your peas will bounce back stronger, and next season’s harvest will be disease-free and delicious! 🌱🍲
Frequently asked questions about pea plant diseases
What’s the difference between powdery mildew and downy mildew on peas?
Powdery mildew appears as white, powdery patches on leaf surfaces, while downy mildew shows as yellow spots on top with gray, fuzzy growth on undersides. The key difference? Powdery mildew thrives in hot, dry conditions, while downy mildew needs cool, damp weather to spread. Both weaken plants but respond to different treatments.
Can I still eat peas if they have fungal spots?
Only if the spots are superficial and small. Remove heavily infected pods or leaves, but avoid eating peas with blackened stems, mushy tissue, or large fungal growths. These can harbor toxic spores. When in doubt, compost the affected parts (not in your garden!) and enjoy the healthy ones.
How do I know if my peas have root rot instead of just wilting from heat?
Root rot causes sudden wilting even with moist soil, blackened, mushy roots, and a foul odor when pulled. Heat stress wilts plants gradually and only during the day. Dig up a plant—if roots are healthy and firm, it’s likely heat or drought. If they’re slimy and discolored, root rot is the culprit.
Will neem oil work on pea diseases like powdery mildew?
Yes! Neem oil is highly effective against powdery mildew when used preventively. Mix 1 tsp neem oil + 1 tsp mild soap + 1 quart water and spray every 7–10 days at dawn. It disrupts fungal spores but works best before outbreaks. For existing infections, combine with baking soda for faster results.
How long does it take to see results from fungicide sprays?
Most organic sprays (like copper or neem) show improvement in 5–7 days with consistent use, while chemical fungicides may work in 3–5 days. The key is reapplying every 5–7 days until symptoms disappear. Stop spraying once new growth appears clean for 2 weeks—this confirms the disease is under control.