Companion Plants
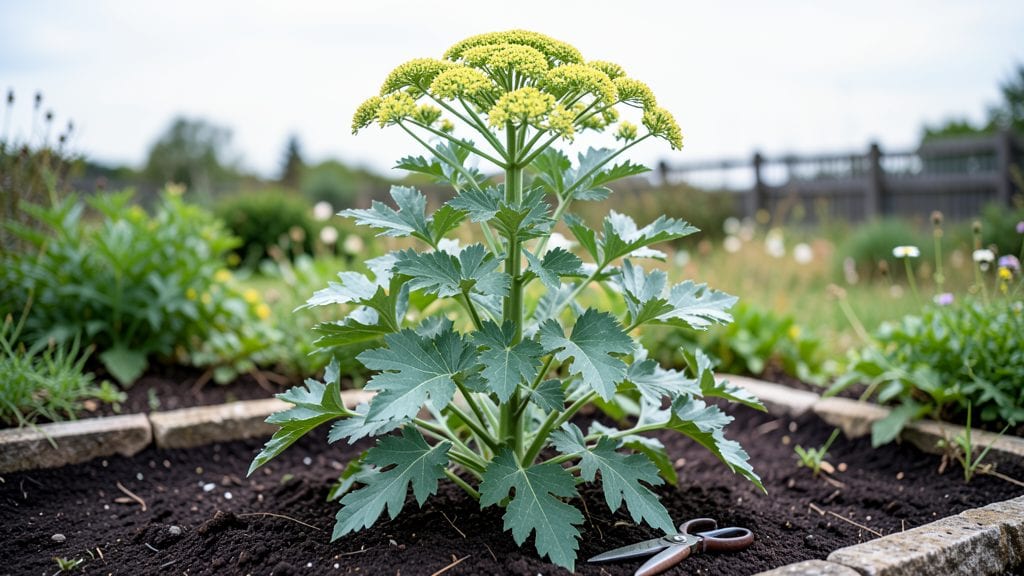
Garden lovage plants are the unsung heroes of the perennial herb garden—tough, productive, and impossible to kill once established. 🌱 I’ve grown them for years, and they’ve never once asked for more than a patch of sun and occasional water.
The secret lies in their hardiness: this plant thrives where others falter, delivering both culinary and ornamental value with almost no effort.
The real magic happens in late spring when the tall, feathery foliage emerges, reaching heights of 4-5 feet by summer. It’s a magnet for pollinators while doubling as a dynamic accent plant in cottage gardens.
The roots even spread gently over time, creating a self-sustaining patch that multiplies effortlessly—no division required for years. For cooking, the leaves and stems have a celery-like flavor, perfect for soups, stews, or as a fresh garnish.
Planting takes minutes: scatter seeds in well-drained soil with full sun to partial shade, and water occasionally until established. Once rooted, they’re drought-tolerant and handle frost down to 20°F without complaint.
Harvest leaves anytime, but avoid cutting more than one-third of the plant at once to keep it lush. By midsummer, you’ll have a year-round herb that keeps giving—no replanting, no fuss.
Here’s the kicker: lovage’s deep roots improve soil structure over time, making it a double-duty plant for any garden bed. Whether you’re growing it for food, pollinators, or pure ornamental drama, this herb does the heavy lifting while you enjoy the results.
Ready to let it take over a corner of your garden?
📚 In This Guide
- What you need
- Instructions
- Tips and common mistakes
- Wrapping up and next steps
What you need
- ● Seeds or nursery plant: 1–2 garden lovage seeds (if starting from seed) or
- ● 1 mature plant (1–2 years old, 12–18" tall) for transplanting.
- ● Well-draining soil: Loamy or sandy soil with a pH of 6.0–7.5 (amend with compost if needed).
- ● Sunlight: Full sun to partial shade (4–6 hours of sunlight daily).
- ● Water: Consistent moisture (1–2 gallons per week during dry spells).
- ● Basic tools: Trowel or small shovel
- ○ Garden gloves (optional but recommended!)
- ● Measuring tape (for spacing)
- ● Mulch: Straw or wood chips (2–3 inches) to retain moisture and suppress weeds.
- ● Fertilizer: Balanced organic fertilizer (e.g., 10-10-10) or compost tea (apply in early spring).
- ● Support: Small stakes (for young plants if needed—lovage is usually self-supporting).
- ● Pruners: For harvesting or shaping (sterilize with rubbing alcohol!).
Step-by-Step instructions for planting and establishing garden lovage
Here's how to get your lovage thriving with minimal fuss—this hardy perennial rewards patience.
🌱 Step 1: Choose the Right Location and Prepare the Soil
Lovage adores full sun but tolerates partial shade, making it a versatile garden addition. Select a spot with at least 6 hours of direct sunlight daily, though it will survive with 4 hours if the climate is cooler. This herb thrives in well-draining soil with a slightly alkaline pH—aim for 6.5-7.5—so amend heavy clay with compost or coarse sand if needed.
Before planting, loosen the top 12 inches of soil with a garden fork to improve root penetration. Work in 2-3 inches of compost to enrich the soil without overwhelming the plant's natural hardiness. Lovage's deep taproot means it dislikes disturbance, so avoid tilling deeper than necessary. The key is creating a loose, fertile bed where moisture can drain freely but nutrients remain accessible.
🪴 Step 2: Plant Divided Roots or Seeds at the Right Time
For fastest results, plant divided roots or nursery-grown plants in early spring (after the last frost) or fall. Dig a hole twice as wide as the root ball but only slightly deeper—lovage roots prefer sitting just below the soil surface. Space plants 2-3 feet apart to allow for their eventual 3-4 foot spread. If starting from seed, sow directly in the garden in late spring after all frost danger has passed, as lovage dislikes transplanting.
Gently place the root or seedling into the hole, then backfill with soil, pressing lightly to eliminate air pockets. Water deeply to settle the soil and encourage root contact. Lovage seeds germinate slowly—2-3 weeks—so don’t be impatient. If using divided roots, ensure each section has at least one healthy bud to ensure regrowth. Mulch around the base with 2 inches of straw or shredded leaves to retain moisture and suppress weeds without smothering the plant.
☀️ Step 3: Water Deeply and Maintain Consistent Moisture
Lovage is drought-tolerant once established, but young plants need consistent moisture to thrive. Water deeply once a week during the first growing season, aiming for 1 inch of water per week. Check soil moisture by inserting your finger 2 inches deep—water when it feels dry. Overwatering is the biggest mistake; lovage roots rot easily in soggy conditions. Once mature, reduce watering to every 2-3 weeks unless experiencing extreme heat.
This herb’s deep roots mean it competes well with weeds, but keep the area around the base clear during the first year. A light mulch layer helps retain soil moisture and regulates temperature. You’ll know your lovage is happy when it sends up its characteristic 3-4 foot stalks by mid-summer. Avoid fertilizing unless your soil is particularly poor—lovage grows vigorously even in average garden conditions.
✂️ Step 4: Prune and Harvest for Long-Term Productivity
Harvest lovage leaves and stems anytime after the plant reaches 12 inches tall, but avoid cutting more than one-third of the plant at a time. Use clean pruners to snip stems just above a leaf node to encourage bushier growth. The best time to harvest is in late spring or early summer before the plant flowers, as the leaves become tougher and more bitter afterward. Regular harvesting actually boosts productivity—plants left unpruned may focus energy on flowering rather than leaf growth.
In late fall, cut back the stalks to 6 inches above ground level to promote new growth in spring. Avoid heavy pruning in winter, as lovage’s woody stems can take longer to regenerate. This perennial will live for 10+ years with minimal care, making it a true garden workhorse. If you notice yellowing leaves, it’s often a sign of overwatering or poor drainage—adjust your watering schedule and check soil composition.
⏰ Step 5: Overwinter and Protect for Next Year’s Growth
Lovage is cold-hardy in USDA zones 3-9, but young plants benefit from a 3-4 inch layer of mulch in winter to protect roots from freezing. In colder climates, mound soil around the base for extra insulation. The plant will go dormant but regrows vigorously in spring. If your winters are mild, you can leave the mulch in place year-round, though remove it in early spring to allow soil to warm.
Spring is the time to assess your lovage’s health. Remove any dead or damaged stems with pruners, and divide mature clumps every 3-4 years to prevent overcrowding. Simply dig up the root ball, separate into smaller sections with a sharp knife, and replant. Lovage spreads easily, so contain it if you don’t want it taking over your garden. With proper care, your plants will reward you with abundant harvests for decades.
Tips & tricks for perfect garden lovage establishment
These practical insights will help you avoid common pitfalls and maximize your lovage's potential from day one.
Soil Preparation Secret: The 12 inches of loosened soil in Step 1 is crucial for those deep taproots. Use a garden fork rather than a tiller to preserve soil structure—lovage roots dislike being disturbed once established. I've found that adding a handful of coarse sand to the 2-3 inches of compost helps create that perfect well-draining environment, especially in clay-heavy soils. This prevents the root rot that can occur when water pools around the roots.
Timing is Everything: When planting divided roots in early spring or fall, aim for temperatures between 50-70°F for optimal root establishment. If you're in a warmer climate, fall planting gives roots time to establish before summer heat. I've learned the hard way that planting too early can lead to frost damage, while planting too late may result in poor root development before winter dormancy. The 2-3 week germination window for seeds is your best indicator—don't rush it!
Watering Wisdom: The once-weekly watering in Step 3 might seem straightforward, but consistency is key. I use a rain gauge to measure that 1 inch of water—it's easier than guessing. For young plants, water in the morning to reduce evaporation and fungal risks. Once established, let the soil dry slightly between waterings—lovage's deep roots will find moisture even in dry conditions. The 2-inch deep soil check is your best friend for determining when to water.
Pruning Strategy: When harvesting in Step 4, always cut at a 45-degree angle just above a leaf node. This technique encourages bushier growth and prevents disease entry points. I've found that harvesting in the morning gives the plant time to recover before evening temperatures drop. The one-third harvest rule prevents stressing the plant—think of it as giving your lovage a spa day between harvests!
Pro Tips for Garden Lovage Plants
- These practical insights will help you avoid common pitfalls and maximize your lovage's potential from day one.
- Soil Preparation Secret: The 12 inches of loosened soil in Step 1 is crucial for those deep taproots.
- Timing is Everything: When planting divided roots in early spring or fall, aim for temperatures between 50-70°F for optimal root establishment.
Frequently asked questions
How do I start growing garden lovage from seed?
Garden lovage thrives from seeds planted directly in the garden after the last frost. Sprinkle seeds ¼ inch deep in well-draining soil, spacing them 12–18 inches apart. Keep the soil moist until germination (10–21 days). Thin seedlings to avoid overcrowding—lovage loves space to spread!
When is the best time to harvest lovage leaves and stems?
Harvest young leaves anytime for a mild celery-like flavor, but wait until the second year for the most robust stems. Cut stems in early spring or late summer for peak flavor. Avoid over-harvesting—lovage is perennial and will regrow, but give it time to recover!
Can I grow lovage in containers, or does it need a garden bed?
Yes! Lovage adapts well to containers if given enough room (at least 12-inch depth and width). Use a large pot with drainage holes and rich, well-draining soil. Just ensure it gets full sun—containers dry out faster, so water consistently. Perfect for patios or small spaces!
What pests or diseases should I watch for with garden lovage?
Lovage is generally pest-resistant, but aphids or slugs may occasionally bother young plants. Handpick pests or use organic sprays like neem oil. Overwatering can lead to fungal issues, so ensure good drainage. If leaves yellow, check for root rot—adjust watering habits to prevent this.
How can I use lovage in cooking, beyond just the leaves?
Every part of lovage is edible! Use young leaves in soups, salads, or as a celery substitute. Mature stems are great for stocks, stews, or even pickling. The roots (when young) can be roasted like parsnips. Pro tip: Freeze chopped leaves in ice cube trays for easy seasoning later!
Wrapping up and next steps
Growing garden lovage is a rewarding experience—this hardy, low-maintenance perennial brings bold flavor and striking foliage to your garden with almost no fuss! 🌱 Whether you’re drawn to its culinary versatility, pest-repelling benefits, or simply its resilience, lovage is a fantastic addition for both novice and seasoned gardeners.
Ready to dive in? Start by selecting a sunny spot in your garden, gather your supplies, and plant your lovage seeds or seedlings this season.
With just a little patience, you’ll soon be harvesting fresh, aromatic leaves and stems to elevate your dishes—and maybe even impress your neighbors with your green thumb! 🌟