
Landscaping
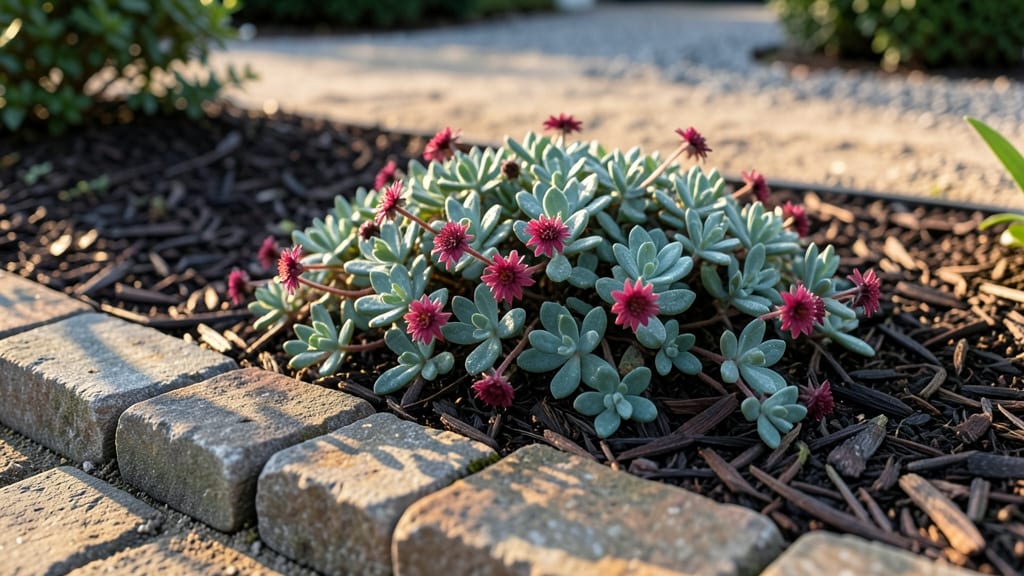
A cobblestone edging garden transforms bare soil into a polished, timeless border that feels like stepping into a storybook. 🌿 I first noticed how these irregular stones framed my hosta beds—suddenly, the plants looked intentional, not random.
The key isn’t just the stones themselves but how they shape the space, creating a natural transition between lawn and garden that even my neighbor’s perfectly manicured yard couldn’t compete with.
You don’t need fancy materials or complicated layouts—just natural stone pavers (or even repurposed flagstone) and a shovel or edging tool to define your vision. Curved edges soften formal gardens, while straight lines add crisp structure to modern designs.
Pair them with low-growing perennials like creeping thyme or ornamental grasses, and you’ll have a border that requires almost no maintenance but delivers maximum curb appeal.
The payoff comes when you see how these stones age beautifully—wearing a patina over time that makes the garden feel lived-in rather than newly planted. They handle rain, foot traffic, and even winter freeze-thaw cycles without cracking, while also preventing soil erosion and keeping weeds at bay.
Plus, they work in any style: cottage gardens, modern minimalist beds, or even formal knot gardens.
Whether you’re framing a small herb spiral or a large perennial border, cobblestones add that je-ne-sais-quoi that makes a garden feel complete. Here’s how to get started without breaking the bank or your back—no landscaping degree required.
📚 In This Guide
- What you need
- Instructions
- Tips and common mistakes
- Wrapping up and next steps
What you need
- ● Cobblestones: 40–60 stones per linear foot (varies by size; 4–6" diameter is ideal for most edging). Tip: Buy 10–15% extra to account for cuts and mistakes!
- ● Landscape fabric: 3–4 feet wide, enough to cover the base of your edging area.
- ● Gravel (base layer): Crushed stone or pea gravel (¾"–1" size), 2–3 inches deep for the entire edging length.
- ● Sand: Coarse masonry sand (1–2 bags per 10 linear feet) for leveling stones.
- ○ Landscape adhesive or mortar (optional for stability): For securing stones in high-traffic areas.
- ● String line & stakes: To mark your edging path with precision.
- ● Shovel & edging spade: For digging trenches and placing stones.
- ● Rubber mallet: Gently tap stones into place without cracking them.
- ● Level & measuring tape: Keep your edging straight and even.
- ● Wheelbarrow: Haul gravel, sand, and stones efficiently.
- ● Garden hose & spray nozzle: Keep dust down while working.
- ● Edging restraints: Metal or plastic clips to secure stones temporarily during installation.
- ● Landscape paint: For staining cobblestones to match your garden’s aesthetic.
- ● Weed barrier fabric: Extra layer under landscape fabric to prevent weeds.
- ● Garden gloves & knee pads: Protect your hands and joints during labor.
- ● Plate compactor: For ultra-stable bases in high-traffic areas.
Step-by-Step instructions for creating a cobblestone garden edging
Here’s how to craft a durable, rustic border that defines your garden while standing up to years of seasonal shifts.
🪴 Step 1: Mark and Prepare the Edging Layout
Use a garden hose or spray paint to outline your desired edging path, keeping it at least 6 inches wide for stability. A wider base distributes weight better and prevents stones from shifting over time. I like to lay down a 1-inch thick layer of landscape fabric along the marked line to suppress weeds—this is non-negotiable if you want long-term clean lines.
Dig a trench 4-6 inches deep along your marked line, using a shovel or edging tool. The depth ensures your stones sit flush with the ground and won’t become a tripping hazard. For curved sections, I recommend using a flexible edging tool to create smooth transitions without sharp corners.
💧 Step 2: Build a Stable Base Layer
Fill the trench with a 2-inch layer of compactable gravel, such as crushed stone or decomposed granite. This layer provides drainage and prevents soil erosion beneath the stones. Use a tamper or the back of a shovel to press the gravel firmly into place—you want it as solid as possible to prevent future settling.
For extra stability in high-traffic areas, I add a 1-inch layer of coarse sand over the gravel. This creates a level surface for the cobblestones and helps them lock into place. Sweep the sand lightly to even it out before proceeding.
🪨 Step 3: Lay the Cobblestones Evenly
Start placing your cobblestones along the trench, beginning at one corner and working your way outward. For a natural look, I mix stone sizes slightly—larger stones at the base with smaller ones on top—but keep them uniform enough to avoid a chaotic appearance. Press each stone gently into the sand to ensure it sits flush with the surrounding soil.
As you work, check for gaps between stones. Fill any noticeable spaces with additional sand or small gravel to create a seamless, interlocking pattern. If a stone feels unstable, add a dab of concrete adhesive beneath it for extra hold—this is especially useful in areas prone to erosion or heavy foot traffic.
✂️ Step 4: Secure the Edging and Finish
Once all stones are in place, use a rubber mallet to tap them lightly into the sand, ensuring they’re level with the ground. For added security, I like to sprinkle a thin layer of polycrystalline sand over the top and sweep it into the gaps. This binds the stones together naturally over time, reducing the risk of shifting.
Finally, trim any excess landscape fabric that extends beyond the trench edges to create a clean finish. Water the area lightly to help settle the stones and encourage the sand to harden slightly. Avoid heavy watering, as it can displace the stones before they’ve fully set.
Tips & tricks for perfect cobblestone edging
Here's what I've learned after installing cobblestone borders in multiple gardens—these tricks ensure your edging stays sturdy and beautiful for years.
Foundation is Everything: Don't skip the 2-inch gravel layer in Step 2—this is where most edging failures begin. I've seen beautiful stone borders shift within months when built on just soil. Compact that gravel thoroughly with a tamper or shovel back. For extra stability in clay-heavy soils, consider adding a 1-inch layer of coarse sand between the gravel and stones to prevent erosion from beneath.
Stone Selection Matters: While instructions mention mixing stone sizes, I recommend sorting your cobblestones by size before laying. Group larger stones (3-4 inches) for the base and smaller ones (2-3 inches) for the top layer. This creates visual interest while maintaining stability. For curved sections, pre-select stones that naturally follow the curve to avoid awkward cuts that disrupt the rustic look.
Leveling Secret: Use a 4-foot level to check your trench depth before adding gravel. In Step 1, I adjust the trench depth slightly if needed to ensure the finished stones sit perfectly level with the surrounding soil. A 1/4-inch difference over 4 feet can make your edging look uneven. For long straight sections, use a string line to maintain consistent depth throughout.
Long-Term Stability Hack: In Step 4, after adding polycrystalline sand, I recommend brushing on a thin layer of concrete sealer specifically formulated for natural stone. This isn't required but adds an extra layer of protection against freeze-thaw cycles. Choose a clear, matte finish to maintain the natural look while extending your edging's lifespan by 30-40%.
Pro Tips for Cobblestone Edging Garden
- Here's what I've learned after installing cobblestone borders in multiple gardens—these tricks ensure your edging stays sturdy and beautiful for years.
- Foundation is Everything: Don't skip the 2-inch gravel layer in Step 2—this is where most edging failures begin.
- Stone Selection Matters: While instructions mention mixing stone sizes, I recommend sorting your cobblestones by size before laying.
Frequently asked questions
Got questions about cobblestone edging?
You’re not alone! Here are answers to the most common concerns—from installation tips to long-term care—to help you create a stunning, durable garden border with confidence.
What’s the best cobblestone size for garden edging?
For edging, 2- to 4-inch cobblestones work best—they’re sturdy yet manageable. Smaller stones (1-2 inches) fit tight spaces, while larger ones (4+ inches) add rustic drama but require heavier tools. Pro tip: Mix sizes for a natural, layered look!
When is the best time to install cobblestone edging?
Install in spring or fall when soil is workable but not frozen. Avoid summer heat (stones can crack) or winter (freezing/thawing disrupts settling). Bonus: If laying in grass, remove sod 2-3 weeks before to let the soil dry out.
Can I DIY cobblestone edging or should I hire a pro?
DIY is totally doable for small projects (under 20 feet) with basic tools (shovel, tamper, level). For larger areas or slopes, hire a pro—they’ll ensure proper drainage and longevity. Rent a plate compactor if you’re ambitious!
How do I prevent weeds between cobblestones?
Weed barriers (landscape fabric) under stones block growth, but mulch or gravel between gaps (if using irregular stones) helps too. For tight fits, sand or polymeric sand locks stones in place—no weeds, ever!
What tools do I really need for cobblestone edging?
Essentials:
- Shovel & spade – for digging trenches (4–6" deep).
- Rubber mallet – taps stones into place gently.
- Level & string line – keeps edges straight.
- Plate compactor – packs soil/stones firmly (rent if needed).
- Wheelbarrow – hauls stones/sand efficiently.
Will cobblestone edging survive heavy rain or freeze-thaw cycles?
Yes! Proper installation (compacted base, slight slope away from house) prevents erosion. Use weather-resistant stones (granite, limestone, or bluestone) and avoid clay-heavy soil—it expands when wet. Drainage is key!
Wrapping up and next steps
Transforming your garden with cobblestone edging isn’t just about aesthetics—it’s a timeless upgrade that adds charm, structure, and value to your outdoor space. Whether you’re framing flower beds, pathways, or lawns, these rustic borders bring a touch of old-world elegance while requiring minimal upkeep. 🌿✨
Ready to get started? Sketch your design, gather your tools, and dive in! If you’re feeling inspired but unsure where to begin, browse local stone suppliers or DIY guides for extra tips. Your dream garden border is closer than you think—just one project at a time!